Hidden shower leaks are frustrating because the water doesn’t always show up where you expect. In Sydney homes—especially apartments and older brick veneer builds—moisture can travel along timber framing, behind skirting boards, or even into the ceiling below before you see a single puddle.
The good news: you can do a surprisingly thorough set of checks without pulling tiles off the wall. The goal isn’t to “prove” the exact failure point like a specialist would—it’s to spot early warning signs, reduce the chance of further damage, and work out whether you’re dealing with a surface water escape (often seals and junctions) or something more serious like waterproofing or plumbing.
What “hidden shower leak” usually means
A shower can leak in a few different ways, and the signs change depending on which one you’re dealing with.
• Surface escape (common): Water slips past failing silicone, gaps at the base junction, a shower screen channel, or cracked grout, then wicks into surrounding materials.
• Waterproofing failure (serious): The membrane behind tiles (or under the floor) isn’t doing its job, so moisture gradually saturates the substrate.
• Plumbing leak (less common, but urgent): A pressurised pipe or fitting behind the wall is leaking, which can cause faster and more extensive damage.
Most homeowner checks are about separating these buckets and recognising the “stop now” red flags.
Your quick toolkit (no special gear required)
You can do most checks with household items.
• Torch (phone torch is fine)
• Dry paper towel or tissue
• Masking tape and a pen (for marking damp patches or dates)
• A ruler (to note crack width changes over time)
• Bucket or jug (controlled water pours)
• Optional but helpful: a basic moisture meter from a hardware store
If you’re in an apartment, have a quick look at strata by-laws before doing anything that could impact neighbours (even something as simple as leaving water running longer than normal).
Step 1: Look for “silent” warning signs around the shower
Start outside the shower itself. Hidden leaks often announce themselves in the nearby finishes first.
Check these areas carefully
• Skirting boards and architraves: swelling, soft spots, peeling paint, or a gap opening at the top edge
• Walls near the shower: bubbling paint, a chalky look, or a “drummy” hollow sound when you tap gently
• Flooring outside the bathroom: lifting vinyl edges, cupping timber, loose laminate, or damp carpet at the doorway
• Ceiling below (if you’re in a two-storey home): yellow/brown staining, sagging plasterboard, or a musty odour
If you find a suspicious patch, mark the edges lightly with masking tape and write today’s date. You’re creating a simple “growth tracker”.
Q&A: Can a shower leak without any water on the bathroom floor?
Yes. Many shower leaks are slow-wicking leaks that soak into the wall/floor structure instead of pooling on the tiles. You might only notice musty smells, swelling skirting boards, or staining in the room next door.
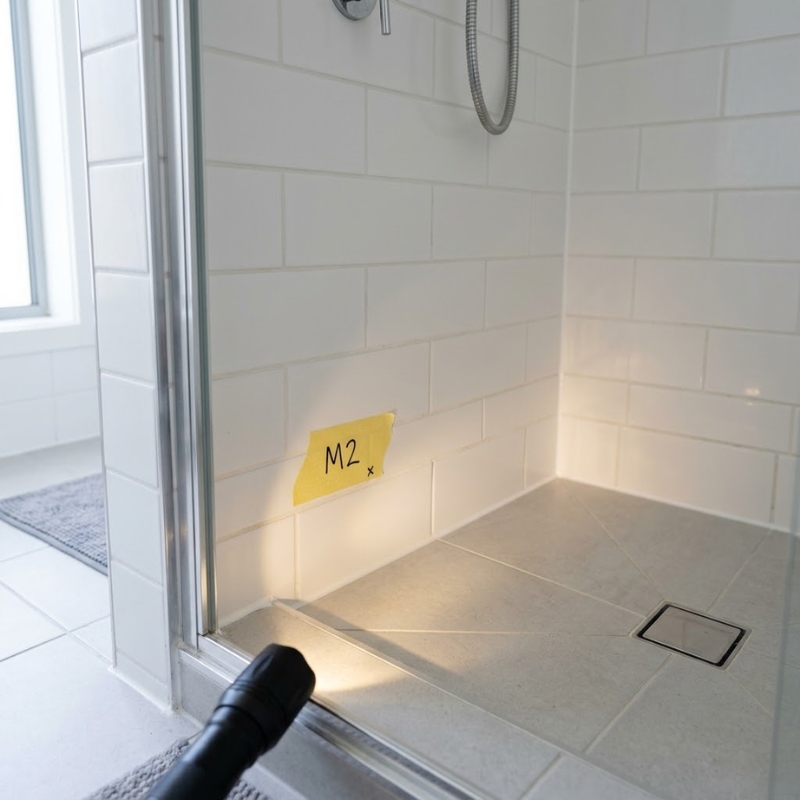
Step 2: Inspect the highest-risk junctions inside the shower
Most hidden shower leaks start at junctions—where materials meet, and movement happens.
2-minute visual check (torch on)
Focus on:
• Base-to-wall junction: the bottom corners and the full perimeter where wall tiles meet the shower base or floor
• Vertical internal corners: especially the corner that gets the most direct spray
• Shower screen edges and channels: where the screen meets tile, and the bottom track
• Penetrations: taps, mixer, shower head arm, and any niche shelving joints
• Grout lines in “splash zones”: around the mixer height and the lower 300–500 mm of walls
You’re looking for:
• Splits or lifting in silicone
• Fine cracks that run along corners (often movement-related)
• Missing grout, crumbly grout, or dark grout that never seems to dry
• Rust stains, white powdery deposits (efflorescence), or persistent mould spots that return quickly
If you already know the silicone looks tired, learning what a proper junction should look like helps you judge whether the issue is purely surface sealing. (For a deeper explanation of what good junction sealing involves, see shower sealing and caulking.)
Q&A: Does cracked grout always mean the shower is leaking?
Not always. Hairline grout cracks can be cosmetic, especially in older homes with movement. The concern is when cracks widen, darken, or stay damp, or when nearby surfaces (skirting/paint) start changing.
Step 3: Do the “dry-down” test (the easiest early indicator)
This test is simple: it tells you whether certain areas stay wet longer than they should.
How to do it
- Use the shower normally.
- After you finish, leave the exhaust fan on (if you have one) and keep the door ajar.
- After 60–90 minutes, return with a dry paper towel.
- Press the towel against:
• the base-to-wall junction
• lower wall corners
• grout lines near the base
• the outer edge of the shower screen channel
What it means
• If the towel comes away damp in the same spot each time (especially after 90 minutes), that area may be allowing water behind the tile line or into a junction void.
• If one corner never seems to dry, it can indicate water is getting behind the surface, not just sitting on it.
In Sydney’s humidity, drying times can be slower—especially in winter or in bathrooms without windows—so focus on “consistently wet in the same place” rather than absolute dry times.
Step 4: The controlled spray test (pinpoint splash-path problems)
The mistake people make is running the shower like normal and hoping the leak reveals itself. Instead, you want controlled, repeatable steps.
Set up
• Put a dry towel on the bathroom floor outside the shower (to catch splashes and prove what’s splash vs leak).
• Close the bathroom door so airflow stays consistent.
• Use your phone timer.
The test
- Spray only the shower screen area (or run water so it hits the screen) for 2 minutes.
- Stop and wait 5 minutes. Check outside edges and the bottom track.
- Next, spray only one internal corner for 2 minutes. Stop, wait, then check.
- Then, spray only the base-to-wall junction for 2 minutes. Stop, wait, check.
- Repeat on the other corner.
What you’re looking for
• Dampness appearing outside the shower when you only target one zone
• Water collecting under/around the screen channel
• A specific corner triggering odour or dampness outside the shower line
If you’re seeing water escape when you target the screen/channel, the issue may be how water is being directed or retained around that track (not necessarily the tiles themselves).
Q&A: Is it safe to “flood test” a shower at home?
A full flood test can push water into places it wouldn’t normally go and may worsen damage, especially in apartments. Controlled spray tests are safer and usually more informative for homeowners.
Step 5: The plug-and-fill base test (only if you can do it safely)
This is a more deliberate test that can help distinguish a base/junction issue from a wall issue. Only do it if you can monitor it closely and you’re confident you won’t affect a neighbour (apartments: be cautious).
How to do it
- Block the waste with a proper plug (not a rag).
- Add a small amount of water—think 10–15 mm depth, not a “bath”.
- Mark the water line with masking tape.
- Leave it for 15–20 minutes without running the shower.
- Check whether the water line drops.
Interpreting results
• Water level drops noticeably (and it’s not evaporation): possible waste connection/base issue.
• No drop, but you still have dampness problems: it may be wall/junction seepage or waterproofing behind tiles.
If your shower base is tiled (not a preformed acrylic base), interpretation can be trickier because water movement in grout lines can confuse the result.
Step 6: The “movement” clues that point to repeated failures
Many Sydney homes experience small movements—seasonal changes, traffic vibration, and building settlement. Movement often shows up as recurring cracks or silicone splitting at corners.
Signs of movement are part of the problem
• The same corner silicone splits repeatedly
• Grout cracks follow the line of a corner or the base junction
• The shower screen feels slightly loose, or the frame shifts when you press gently
• You notice a creak or flex underfoot (especially in older timber subfloors)
If movement is causing seals to fail, patch fixes tend to be temporary unless the junction is prepared and sealed correctly. Understanding how and why silicone fails can help you make better decisions about what’s worth redoing and what’s a bigger underlying problem. (This is where guidance on replacing failed shower silicone can be useful as background reading.)
Step 7: Rule out a plumbing leak (without opening walls)
A plumbing leak usually behaves differently from a surface leak.
Signs that lean plumbing
• Dampness increases even when the shower isn’t used
• You hear hissing or water movement when everything is “off”
• Damp patches appear higher up the wall (not just near the base)
• The issue worsens quickly over days rather than weeks/months
Safe checks you can do
• Compare “shower used” vs “not used” days: If dampness grows on days you don’t shower, suspect plumbing.
• Water meter check (house only): If you have a meter, take a photo of the numbers, avoid using water for 30–60 minutes, then recheck. Movement may indicate a leak somewhere on the property (not necessarily the shower).
If you’re uncertain, escalate sooner rather than later—plumbing leaks can cause rapid structural damage.
Step 8: When the signs point to waterproofing problems
Waterproofing issues are often slower and sneakier. They can also be more expensive if ignored.
Red flags for waterproofing failure
• Persistent damp smell that returns shortly after cleaning
• Loose/hollow tiles developing over time
• Grout lines that darken and don’t lighten as they dry
• Repeated silicone failures even after redoing it properly
• Damage spreading beyond the shower footprint (hallway wall, adjacent room)
In Australia, wet area waterproofing requirements are addressed through the National Construction Code (NCC), and understanding the intent (keeping water out of building structure) helps explain why recurring seepage is a bigger deal than a cosmetic crack. Here’s a good reference point from the NCC on wet area waterproofing expectations: National Construction Code wet area waterproofing guidance.
Q&A: If waterproofing has failed, will I always see obvious damage?
No. Early waterproofing failure may only show as odour, persistent damp grout, or small paint changes. Obvious swelling and staining often appear later, after more moisture has built up.
Step 9: Document what you find (this makes the next steps faster)
Whether you end up calling a pro or not, a simple record helps avoid guesswork.
• Take photos of any cracks, mould spots, or split silicone (wide + close-up)
• Write down:
– when the shower is used
– where dampness appears
– whether it changes after rain/humidity
• If you used controlled tests, note which zone triggered dampness
This kind of documentation often speeds up diagnosis and reduces unnecessary “trial and error”.
Practical checklist: Your 20-minute hidden leak inspection
Use this as a quick run-through:
• Check skirting boards, adjacent walls, and flooring for swelling/peeling
• Torch-check all internal corners and the base junction
• Look closely at shower screen channels and bottom tracks
• Press a paper towel on suspect joints after 60–90 minutes drying
• Do a controlled spray test (one zone at a time)
• If safe, do a shallow plug-and-fill base test
• Compare “used” vs “not used” days for plumbing clues
• Photograph and date anything suspicious
If you want a printable-style reference of the common failure points and what to look for, a shower resealing checklist can help you keep your observations structured without turning your bathroom into a demolition site.
When to stop DIY checks and escalate
There’s a line where “checking” becomes risky or ineffective.
Stop and escalate if you notice:
• Ceiling staining or sagging below the bathroom
• Rapidly spreading dampness over days
• Electrical concerns (buzzing light, water near fittings)
• Strong, persistent musty odour that returns quickly
• Loose tiles or movement in the shower base/screen
• Water appearing outside the bathroom footprint
In apartments, escalating early is especially important because water doesn’t respect lot boundaries.
FAQs
How do I know if my shower is leaking behind tiles?
Look for recurring dampness in the same corner/junction, skirting board swelling, bubbling paint, persistent musty smells, or grout that stays dark long after the shower is used. Controlled spray tests help narrow down which zone is letting water escape.
What’s the first sign of a hidden shower leak?
Often it’s not water on the floor—it’s a smell, a soft skirting board, or paint changes on the wall outside the shower. In multi-storey homes, ceiling staining below can be an early sign too.
Can I fix a hidden shower leak by regrouting?
Sometimes regrouting helps if the issue is minor surface cracking, but grout alone isn’t a waterproof barrier. If water is getting past junctions or the waterproofing system has failed, regrouting can be a temporary cosmetic improvement rather than a true fix.
Why does the same corner keep getting mouldy?
Corners are high-splash zones and common movement points. If silicone has split, or moisture is getting behind the tile line, mould can return quickly, even after cleaning, because the area stays damp internally.
What if my shower only leaks during heavy rain?
Rain-related moisture can enter through other building points and show up in the bathroom, but showers can also reveal existing dampness because humidity stays higher there. Track “rain days” vs “shower use days” to avoid blaming the wrong cause.
Is a moisture meter worth buying?
A basic meter can help compare “dry” vs “suspect” areas and track changes over time. It won’t tell you the exact failure point, but it can confirm whether moisture is trending up or down.
When is it likely a plumbing leak instead of the shower sealing?
If dampness grows when the shower hasn’t been used, if the issue worsens quickly, or if signs appear higher on the wall, plumbing becomes more likely. If you suspect plumbing, escalating quickly is sensible.