Bathroom waterproofing problems rarely announce themselves with a dramatic puddle. They usually start quietly: a musty smell that won’t go away, grout that stays dark long after a shower, paint that starts bubbling in a corner, or a skirting board that looks slightly “puffed up” near the door.
In Sydney, these issues can be easy to brush off as “humidity” or “old building quirks”—especially in apartments where bathrooms have limited ventilation and are used daily. But when moisture gets where it shouldn’t, the damage can spread invisibly behind tiles and wall linings long before it becomes obvious.
This guide breaks down the early warning signs that often appear first, what they typically indicate, the safe checks you can do without ripping anything up, and the red flags that mean you should stop DIY investigation and escalate.
What bathroom waterproofing failure actually looks like (in real life)
It helps to understand that tiles and grout are not a waterproof barrier. They’re the wear surface. Water can move through grout lines, around fixtures, and into tiny gaps at corners and junctions. The waterproofing system (membrane and detailing beneath/behind the finishes) is what’s meant to stop that moisture from entering the building structure.
When waterproofing starts failing, you’ll often see one of these patterns:
• Slow, repeatable moisture signs (odour, dark grout, recurring mould)
• Surface breakdown (silicone splitting, grout falling out, cracking at junctions)
• Structural clues (hollow tiles, swelling skirtings, bubbling paint, stains outside the bathroom)
The earlier you identify the pattern, the easier it is to reduce ongoing water exposure and prevent the “big” damage.
The most common failure points in bathrooms
Most issues cluster around details where movement and water exposure are highest:
• Floor-to-wall junctions (especially in showers)
• Internal corners
• Shower screens and channels
• Penetrations: taps, mixers, shower arm, spouts
• Shower niches and shelves
• Around floor wastes and puddling zones
• Door jambs and transitions (bathroom doorway and adjacent walls)
Wet area waterproofing provisions in the National Construction Code (NCC) place strong emphasis on correct detailing at junctions, penetrations, and floor wastes because these are predictable weak points when poorly executed. You can see the intent in the NCC wet area waterproofing guidance here: National Construction Code wet area waterproofing provisions.
Your low-risk inspection kit (no special gear required)
You can do a meaningful early check using:
• Torch (phone torch is fine)
• Paper towel or tissue
• Masking tape + pen (to mark stains/cracks and date them)
• Small ruler (to track crack changes)
• Optional: a simple moisture meter (useful for comparing “dry” vs “suspect” areas)
Avoid invasive tests. If you’re in an apartment, avoid anything that could cause leakage into neighbouring lots.
Early sign 1: Musty smells that return quickly (even when it looks “dry”)
Smell is often the first clue because trapped moisture feeds microbial growth in hidden cavities.
What to look for
• A persistent musty/earthy smell near the shower or vanity
• Odour is strongest after showering, even when the bathroom dries out
• Mould that reappears in the same spot despite cleaning
What it usually means
• Moisture is lingering behind finishes (tiles, skirting, wall lining)
• Water is entering a junction/penetration and not drying properly
• Ventilation may be worsening the problem, but the root cause can still be water ingress
Safe next check
Clean and dry the area thoroughly, then observe whether the smell returns after normal use. If it reliably returns, treat it as a moisture source problem—not just “bad airflow”.
Q&A: How do I tell mould from a ventilation problem vs a waterproofing issue?
Ventilation issues usually cause more uniform condensation (mirrors, windows, broad surface dampness). Waterproofing-related moisture tends to be localised and repeatable in the same corner, grout line, or adjacent wall/door area.
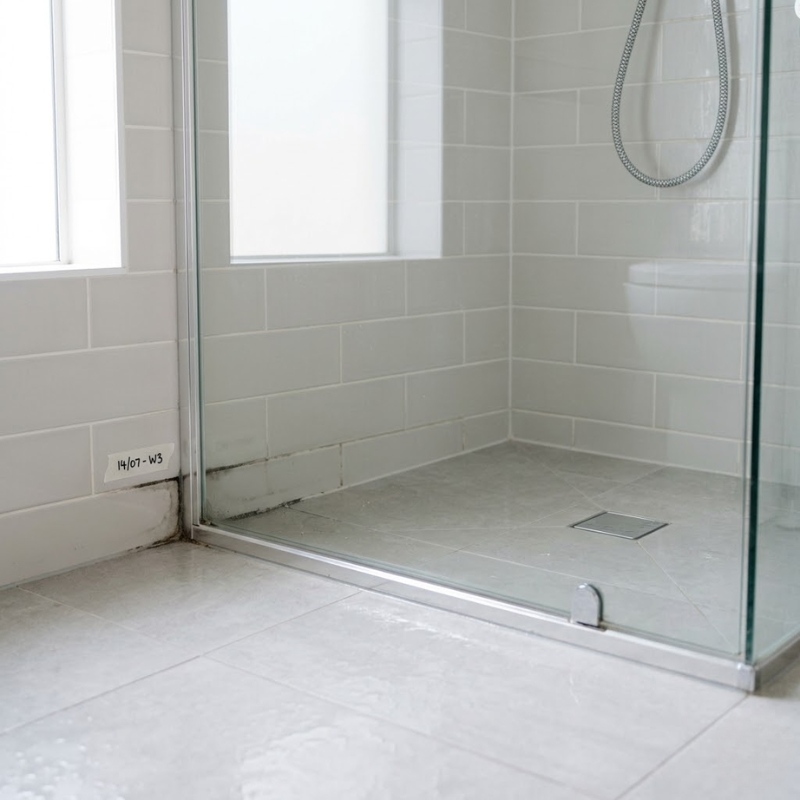
Early sign 2: Grout that stays dark long after use
Grout can darken temporarily after a shower—that’s normal. The concern is grout that remains dark in the same areas for long periods, indicating ongoing moisture.
What to look for
• A consistent dark strip along the base junction
• One corner that looks “wet” even hours after showering
• Grout that feels cool/damp to the touch compared to other areas
What it usually means
• Water is wicking into the substrate at a junction or through a defect
• The system beneath isn’t drying as expected
• In some cases, the waterproofing detail at the base or corner may be compromised
Safe next check: the dry-down test
After showering, ventilate normally. After 60–90 minutes, press a dry tissue on the suspect grout/junction and compare it to a “normal” area. Repeat over a few days. Consistent dampness in the same zone is a meaningful pattern.
Early sign 3: Silicone splitting, lifting, or moulding at corners and junctions
Silicone (or sealant) is a common weak link because corners move. Even a small movement can open a pathway for water to migrate behind finishes.
What to look for
• Fine splits along internal corners
• Lifting at the base-to-wall junction
• Mould tracking along the seal line (especially if it returns quickly)
What it usually means
• Water is getting behind the seal line
• Movement or poor preparation has reduced seal performance
• If it repeats after re-sealing, it can point to a deeper issue (movement + moisture cycling)
If you want a deeper explainer that covers what good wet-area sealing should look like (without turning this into a service page), this internal reference can help: bathroom waterproofing guide.
Q&A: If I redo silicone, will that fix a waterproofing failure?
Redoing the silicone can help if the issue is a minor surface water escape. But if water is already migrating behind tiles due to membrane/detail failure, silicone alone won’t solve the underlying pathway.
Early sign 4: Bubbling paint, peeling, or “chalky” walls near the bathroom
Paint and plasterboard are sensitive to moisture. Often, the first visible changes appear outside the wet zone (e.g., hallway wall beside the bathroom).
What to look for
• Bubbling paint near the shower wall on the other side
• Peeling paint at the bottom 100–300 mm of the wall
• Chalky residue or soft plasterboard near skirting height
• A damp patch that grows slowly over weeks
What it usually means
• Moisture is moving into wall cavities or along the base plate
• Water is escaping the wet area system and affecting adjacent finishes
Safe next check
Mark the edges of the patch with masking tape and date it. Photograph weekly. Growth over time supports “ongoing moisture”, not a one-off event.
Early sign 5: Swollen skirting boards, lifting flooring, or damp at the doorway
This is one of the most telling patterns because bathrooms are often a high point in the home’s internal moisture migration story—especially if water is escaping under tiles.
What to look for
• Skirting board swelling or separating from the wall
• Timber or laminate lifting near the bathroom door
• Vinyl edges curling up
• Damp smell is strongest at the doorway
What it usually means
• Moisture is travelling under the floor finish or within subfloor materials
• Water may be escaping the shower area and moving toward the doorway
• In apartments, water can also track into common property wall/floor junctions
Safe next check
Compare “shower use days” vs “no shower days”. If swelling/dampness increases on days the bathroom isn’t used, consider plumbing as a possibility.
Early sign 6: Loose, rocking, or hollow-sounding (“drummy”) tiles
A hollow sound isn’t always catastrophic, but it’s a strong signal that something has changed underneath—often adhesive breakdown linked to moisture and movement.
What to look for
• A tile that sounds hollow compared to neighbouring tiles
• Subtle movement underfoot
• Cracks forming around the edges of a tile that wasn’t cracked before
What it usually means
• Tile adhesive deterioration
• Substrate movement or saturation
• System stress that may spread over time
Safe next check
Map the area (a quick sketch works) and note whether the hollow zone expands over a month or two. Expanding “drummy” areas is a red flag.
Q&A: Can waterproofing fail even if tiles look perfect?
Yes. Many failures start underneath—at junctions, penetrations, and membrane details. Tiles can look fine while moisture accumulates behind them.
Early sign 7: Recurring mould in the same “line” or corner
If mould returns in the same location, especially at corners or around a niche, it may be reflecting ongoing dampness behind the surface.
What to look for
• Mould that consistently appears at one internal corner
• Mould around a shower niche perimeter or shelf
• Mould around the mixer/penetration area
What it usually means
• Persistent moisture behind the tile line
• A weak point at a penetration or detail where water enters repeatedly
• Cleaning removes the symptom, not the cause
Safe next check
After cleaning, monitor whether the mould returns in the same pattern after a similar number of showers. Repeatability matters.
Early sign 8: Staining or damage in the ceiling below (two-storey homes)
If there’s staining beneath the bathroom, treat it seriously. This can indicate a more advanced moisture issue.
What to look for
• Yellow/brown ceiling staining
• Sagging plasterboard
• Peeling paint below the bathroom footprint
What it usually means
• Water is escaping the wet area system and travelling downward
• Could be a waterproofing failure, plumbing leak, or a waste/drain issue
Safe next check
Avoid running “extra tests”. Document the stain, note recent shower use, and escalate.
Safe homeowner checks that won’t damage your bathroom
You can’t fully diagnose waterproofing without specialist methods, but you can collect enough evidence to avoid guesswork.
Controlled spray test (low risk)
Instead of running the shower normally, test one zone at a time:
• Spray only one corner for 2 minutes → stop → wait 5 minutes → check outside/adjacent areas
• Spray only the base junction for 2 minutes → stop → check
• Spray around penetrations (carefully) → stop → check
This helps identify whether symptoms relate to specific splash zones and junctions.
Documentation routine (especially helpful for strata)
• Photos: wide and close-up, same angles each time
• Dates on tape markers
• Notes: “after shower”, “after rain” (if relevant), “no use day”
If you want a structured set of checks to keep your notes consistent, this internal reference can help: wet area waterproofing checklist.
What NOT to do when you suspect waterproofing failure
Some well-meaning DIY steps can worsen damage or mask the real issue:
• Don’t do a full “flood test” in an apartment bathroom
• Don’t keep re-siliconing repeatedly without understanding why it’s failing
• Don’t seal everything with random coatings (it can trap moisture and create worse deterioration)
• Don’t ignore hollow tiles or swelling skirtings—these usually don’t reverse on their own
When to stop DIY checks and escalate
Escalate quickly if you notice any of the following:
• Ceiling staining below the bathroom
• Loose tiles, expanding hollow areas, or movement underfoot
• Swollen skirting boards spreading beyond the bathroom
• Water near electrical fittings (exhaust fan, lights)
• Rapidly worsening symptoms over days
• Strong musty smells that persist even with good ventilation
If you’re at that point, you’ll get more value from a structured assessment than from repeating surface fixes. For a plain-English overview of what an inspection typically focuses on (junctions, penetrations, floor wastes, and moisture pathways), this internal resource can help you understand the basics: bathroom waterproofing inspection basics.
Common Sydney scenarios (and what they often indicate)
Apartment bathroom with recurring mould but “no leaks”
This can be ventilation plus a localised weakness at a corner or penetration. The tell is repeatability in one spot and damp grout that doesn’t normalise between uses.
Older Sydney home with bubbling paint in the hallway wall beside the bathroom
Often points to moisture migration beyond the wet zone, sometimes from the shower wall cavity or base junction. It’s a strong reason to document and escalate early.
Renovated bathroom with a persistent damp smell within the first year
That can happen if detailing around penetrations, niches, or junctions wasn’t executed correctly, or if drainage/falls are sending water where it shouldn’t go. Early intervention matters because damage can spread behind new finishes.
FAQs
What are the first signs bathroom waterproofing is failing?
Common early signs include musty smells that return quickly, grout that stays dark in the same spots, recurring mould in one corner, silicone splitting at junctions, bubbling paint near the bathroom, swelling skirting boards, and hollow-sounding tiles.
Can waterproofing fail without visible leaks?
Yes. Moisture can accumulate behind tiles and wall linings for a long time before it becomes visible. By the time you see clear staining or swelling, the issue may already be advanced.
Do cracked grout lines mean waterproofing has failed?
Not always. Hairline cracking can occur from normal building movement. Concern rises when cracks widen, repeat in lines, come with persistent damp grout, or appear alongside hollow tiles or nearby paint/skirting changes.
What does a hollow tile sound indicate?
It often indicates debonding beneath the tile—sometimes linked to moisture exposure and movement. One hollow tile isn’t definitive, but expanding hollow areas are a red flag.
What areas fail most often in bathrooms?
Corners, floor-to-wall junctions, penetrations (taps/mixers/shower arms), shower niches, and floor waste zones are common weak points because they experience movement and direct water exposure.
When should I stop checking and get it assessed?
Escalate if symptoms worsen quickly, if you see ceiling staining below, if tiles are loose or hollow areas expand, if skirting boards swell, or if you suspect a plumbing leak (dampness grows even when the bathroom isn’t used).
)
&description=&image=https://leakingshowerrepairs.com.au/wp-content/uploads/2026/04/Early-Signs-Your-Bathroom-Waterproofing-Is-Failing-Before-Major-Damage-Shows-Up.jpg)